Hey and welcome to my Overwatch Ashe guide. In this guide, I will feature the mid-range DPS hero Ashe. I and other pro Overwatch 2 boosters have played Ashe a ton in most of the Skill Rating ranges during Overwatch 2 boosting sessions and I wanted to share my knowledge with you. Ashe is quite hard to play, so be prepared for a high learning curve. Training ground wouldn’t be a waste of time when preparing to practice with Ashe due to extreme precision required. Veteran Cassidy players will have less trouble with her and know exactly what I’m talking about. But rest assured, with enough practice and maybe a couple of coaching sessions with our Overwatch coaches, you can too become a Grandmaster Ashe. Without further ado, let’s dig in.
Ashe Abilities
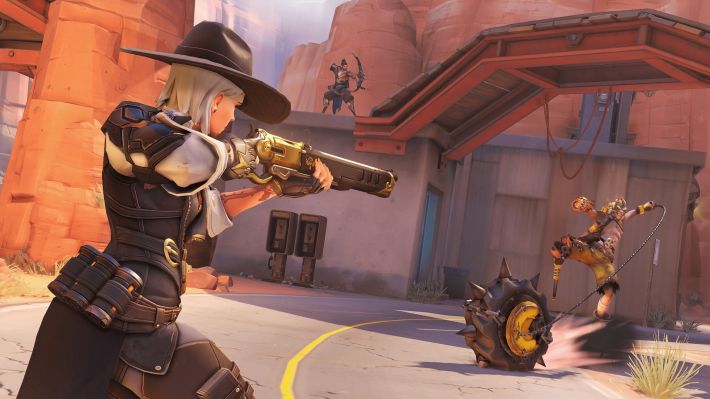
The Viper (Primary Fire)
Ashe’s primary damage source comes from The Viper, her rifle. Pressing the button fires a barrage of single shots, it’s worth noting that aiming down sights reduces the rate of fire, but increases the precision and damage. When scoped (aim down sights), a direct hit will deal 85 damage (around 170 for a headshot) and can two-shot many squishies. Use hip-fire in close quarters and on big targets for more damage, and aim down sights when trying to kill squishies from mid-range. The magazine holds 12 bullets and the falloff is about 20 to 40 meters, meaning that Ashe is amazing in mid-range, and somewhat amazing in close range due to the bullet spread during hip-fire and falloff during hip-fire and scoped. Long-range does not suit her. The reload time is quite lengthy, around 4 seconds, this is obviously due to her high damage. Be aware of that when using The Viper because you can’t allow yourself to go without a full magazine into a dedicated team fight or any other strategies you think of.The Viper Tips & Tricks
- Call for your Mercy to damage boost you because the Viper can one-shot squishies with a headshot when you’re boosted. Same works for Orisa or Zenyatta.
- Use the aim down sights more than you use hip-fire, hip-fire should be used for spraying big targets or when there’s just not enough time to aim down sights
- Always look at your magazine status in order not to dedicate to fights with an empty or near-empty magazine, reloading takes about 4 seconds and you don’t want to reload mid-fight
- A good way to burst down targets is shoot one hip-fire bullet, than follow up by aiming down sights
- Aim spread will happen after 3 shots and reach it's maximum after 6th shot. It resets after 1.5 seconds since the last unscoped shot. This is valuable info because after 3rd shot you probably won't hit any target on mid range.
- Ashe’s scoped sensitivity is different than Widow’s or Ana’s because she zooms in less, so if you’re transitioning from Widow or Ana be aware of this.

Coach Gun
Ashe’s secondary weapon will provide you with three functions. It can knock back enemies relocating them where you want them or simply kill. It works very similar to Lucio’s Sonic Blast. After you use it, a small boom happens from the Coach Gun and deals up to 90 damage when the enemies are at point-blank range, but falloff damage is quite big so the damage won’t be nearly as good. You can use it similar to Lucio’s boop but be careful that you have safe space behind you if you launch yourself far enough, you don’t want to fall into a hole. But, primarily this ability is used to gain high-ground and disengage. The effect is similar to Junkrat’s mine launch, when you’re in the air you have decent control over your hero. When aiming directly into the floor, you are launched in the air and that’s when you try to achieve high-ground, you don’t need to actually have anything underneath you in order to launch yourself, so use the ability to save yourself from going into a pit or double-jump.Coach Gun Tips
- Console players beware as flicking to the ground and instantly moving back your aim is harder than it is on PC.
- If you crouch jump, it doesn’t change the distance of the jump but it does slightly reduce your hitbox while you’re flying, which can sometimes be useful.
- You can launch yourself laterally (to the sides) and it will launch you in the opposite direction of your firing direction for the same distance (about 10 meters).
- Jumping before using the Coach Gun will increase the vertical distance traveled which is crucial to know since some high-ground spots are that far away from reaching
- You cannot knock D.Va through the barrier or a Genji who is deflecting, however, you will still be launched back no matter what, but if you survive the deflect, you will be launched back for twice the distance.
- The cooldown is 10 seconds so use it wisely.
Dynamite
Ashe throws a dynamite stack forward and it explodes after 2 seconds, doing burst damage + applying a damage over time (DOT) debuff that can be cleansed with health packs, Zarya’s Particle Barrier, Moira’s Fade, Reaper’s Wraith Form or Doomfist’s Meteor Strike. What’s interesting here is that it allows you to make amazing plays by detonating it earlier than two seconds with The Viper or Coach Gun. You can kill people behind corners, detonate it in a larger group of enemies and so on. The Dynamite will bounce off shields like Reinhardt’s barrier, but, you can throw it in an arc-way for instance above the team protected by a frontal barrier, detonate it above their heads for massive damage. It can seem tricky at first but after you get the hang of it, it should be a piece of cake and an automatically mechanic work by you, similar to driving a car.Dynamite Tips & Tricks
- If you need a super-fast detonation for burst damage immediately, hold the left mouse button while throwing the Dynamite and it won’t miss.
- If you’re damage boosting while using Dynamite, the initial burst damage is increased, but not the DOT.
- The DOT effect also affects turrets and barriers. If you throw it and it hits the barrier, it will bounce off, but if it explodes in range of the barrier, it will damage it and apply the DOT effect.
- Practice using Dynamite as a zoning tool as well, it has 2 seconds to detonate and it’s great to throw it in the area you want to zone such as a Payload so enemies move away and you can close the gap before it detonates
- You can use Dynamite to disengage from Winston, if you seem him jumping, use the Dynamite on the place he’s about to jump and disengage + detonate it
B.O.B.
And finally, the ultimate. Ashe’s ultimate will summon you a big robot that charges forward, knocks the first enemy he reaches into the air and stops while firing bullets onto anyone in line of sight. Pretty dope. After he charges and stops he will remain there for about 15 secs or until somebody kills him, RIP. The first charge + knock will deal about 120 damage to anyone he hits, while the bullets will do a maximum of 1100 damage. He has 1000 HP and interestingly enough you can heal him, sleep him, trap, freeze, teleport and so on, pretty much like a real hero. He can even contest payloads and control points, and is included for Wrecking Ball’s Adaptive Shield.B.O.B. Tips
- He does act like a real hero but nobody will gain ultimate charges when interacting with him
- Sombra’s hack is quite detrimental to him because it shuts him down for 10 seconds (duration of BOB is 15 seconds).
- Orisa can fortify to prevent BOB from knocking her in the air but still receive some damage
- If D.Va is charging up her Self Destruct, stand behind BOB because he can take it and you break the line of sight and remain undamaged.
- Don’t activate BOB to run and expect him to be smart, he will run off a cliff if you activate him towards the cliff
- If someone is in your face like a Reinhard’t smashing you and you don’t have a Coach Gun to disengage, activate BOB to stop him. Using BOB on an enemy Reinhardt, opens up a shatter for your Reinhardt if you have one.
- Make sure to combo BOB + scoped headshots if you knock a squishy in the air for a free kill
Ashe’s Strengths
Ashe is quite amazing when it comes to zoning due to her Dynamite and BOB. Dynamite is also very useful for doing damage behind barriers as explained above. A good Ashe with great aim is terror for squishies, like I said, a damage boosted Ashe can one shot squishies. Coach Gun allows you to take high ground and snipe enemies from them or even flanking. Coach Gun can also be used as an escape and boop off the map similar to Lucio. BOB allows you to once again zone, stall an objective/payload or simply set them up for kills. Pharah and Mercy (Pharmercy much?) are threatened by Ashe simply because her range is good enough to scope them down with ease.
Ashe’s Weaknesses and Counters
Ashe is a squishy herself, low HP makes her quite vulnerable if caught off guard so stay just out of range of dive heroes (far enough so Winston won't be able to reach you if he uses his Jump Pack) should be an ideal position since she's not highly affected by damage falloff. She can also burn herself with the Dynamite’s DOT. Her long cooldowns are a pain for players who do not use them wisely. Multiple targets on her is a quite bad situation because she can’t deal with them all due to only one escape ability. Similar to Cassidy, she is squishy and doesn’t prefer more than 1 enemy hero on her. After coach gun is used, she’s stuck and possibly dead. However, when paired with a barrier hero such as Reinhardt, the beauty starts. Not having a barrier to protect her, means that enemy Widow or Hanzo can oneshot you just like you can one shot them. Enemy Genji, Tracer or Torb sitting on you and your cooldowns being used, means she’s likely as good as dead. Our Ow boosting professionals will opt-in for such strategy to kill Ashe 9/10 times. I consider Genji to be the hardest counter due to his ability to jump and follow you when you take the high ground with Coach Gun. Mei is also quite a pain due to her Ice Block that prevents DOT damage from Dynamite or even block it completely until Dynamite’s 2 second timer passes. If she gets close enough to freeze Ashe - Ashe is dead. Doomfist can one shot Ashe with Rocket Punch if he gets close enough, similar story is for Winston and Wrecking Ball. Anyone that is highly mobile and can gap close Ashe is terrible for her.What To Practice After Finishing This Guide
The staple of playing Ashe is practicing her aim and positioning. Period. Practice your hip-fire and your aim down sights. You need those headshots to one shot squishies when boosted because that might be the only chance you’ll get. Work on your positioning, find high grounds whenever possible. Practice detonating your Dynamite because in most situations you will need to detonate it to achieve your goal. To get that final push that you need to become a Top 500 Ashe, hire one of our pro Overwatch 2 coaches and let a player specializing in Ashe teach you. I’d love to hear what do you think about Ashe? How are your results with her? Let me know in the comments below and good luck!
Top 100
Secure your Overwatch seasonal rewards, today.