Introduction By Our HotS Boosting Team
Hey, lads. Our Heroes of the Storm boosting team will talk about the HotS Hanamura map, you'll see some general info on how the map works but also some great tips that can help you draft better and maximize your win rate on this HotS map. A complete Hanamura guide to be precise. Let's dig in!What's Hanamura exactly?
Hanamura is a map from the Overwatch franchise. Located in Japan, it is a suburban area that features temple grounds and Shimada Castle, which is quite large. With its restaurants, shops, and prime cherry blossom viewing, Hanamura is a popular tourist destination, but the sleepy town hides a dark secret known only to a select few.For generations, the town was the home of the Shimada Clan, to which Hanzo and Genji used to belong.
Hanamura In Short
- 7 HP Core- 2 Payloads for each team, each delivery fires 1 shot at enemy core.
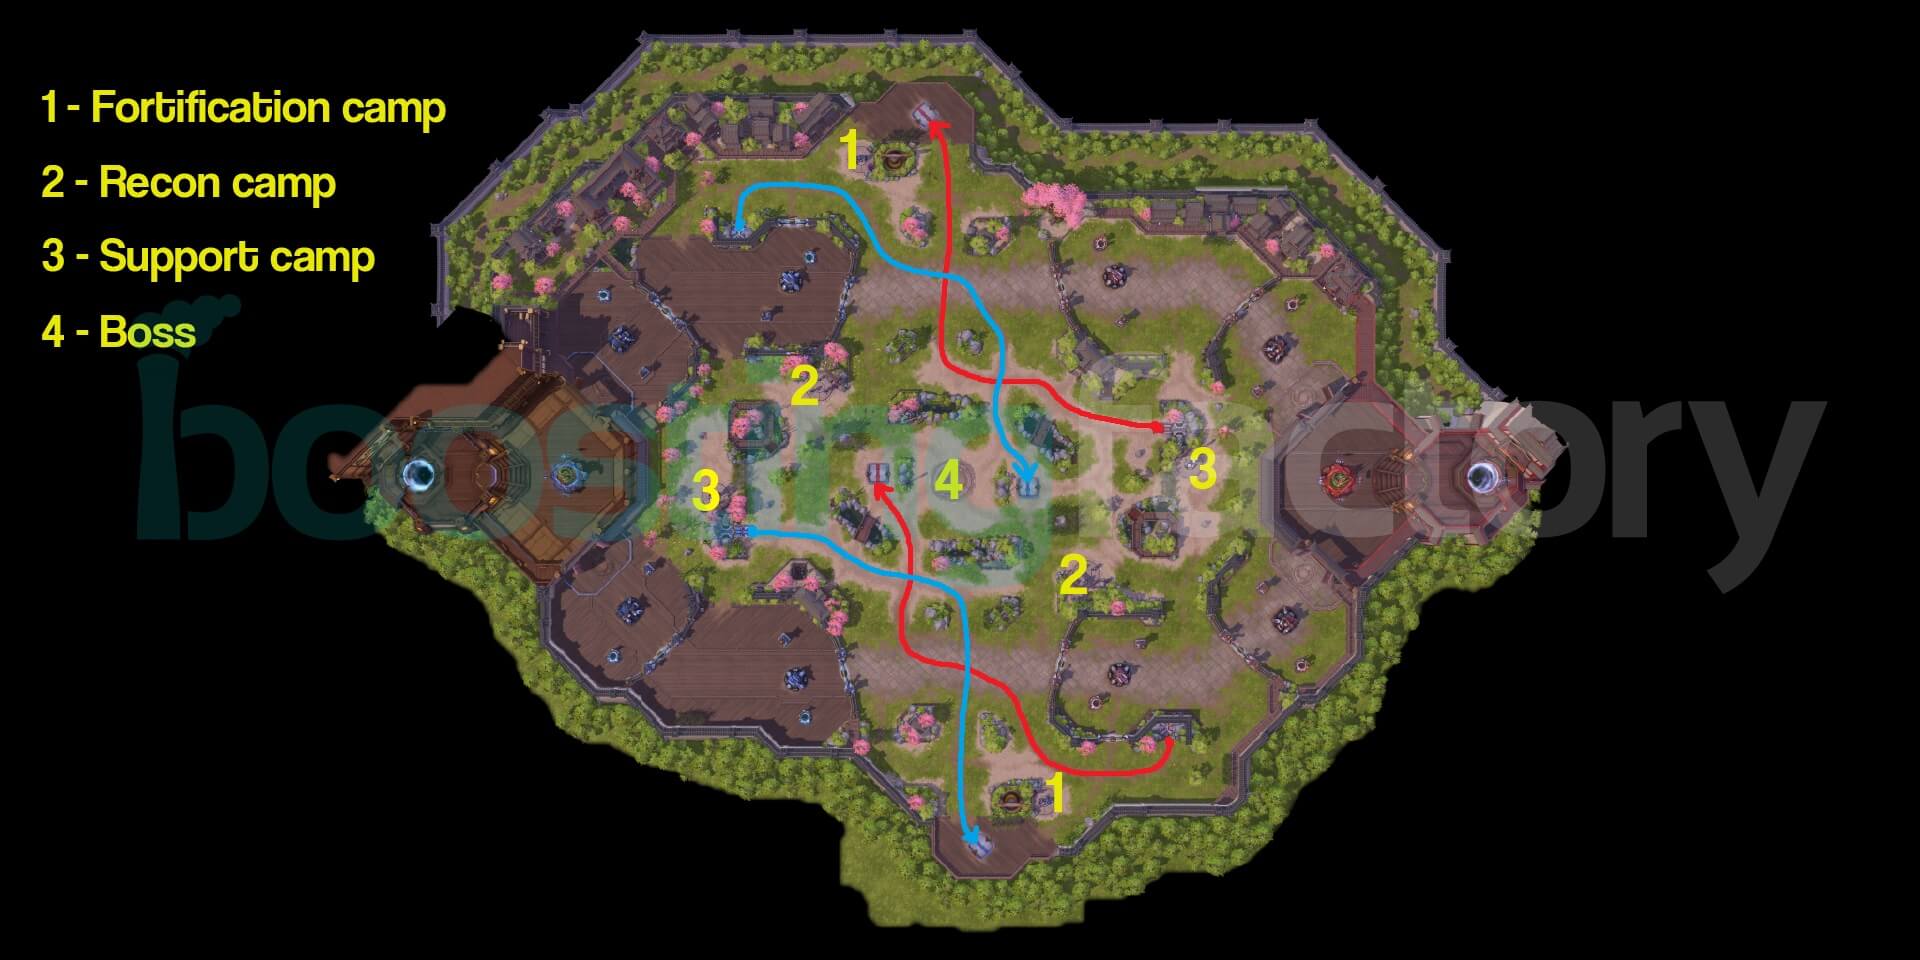
- 2 Fortification camps, drop a fort that you can place anywhere, even on payload. It also body blocks.
- 2 Recon camps, drop a buff that you press to send out ghosts that seek for enemies.
- 2 Support camps, drop a buff that you press to heal yourself and allies.
- 1 Boss, kill fires 1 shot at enemy core.
Map Info And Timers
Payloads
- 2 Payloads per side maximum- 4 minutes spawn timer after each capture
- Mid Payload spawns at 2:30min
- Side Payload spawns at 4:30min
- 30 second countdown before spawn
- Deals 1 core damage, +1 damage per fort or keep destroyed. The bonus is lost once a payload is escorted.
Payload Speeds
- 1 hero nearby takes 50 seconds to escort- 2 heroes nearby takes 40 seconds to escort
- 3 heroes nearby takes 30 seconds to escort
- Starts to reverse after 10 seconds if left alone
Super Minion - Sapper
- Spawns once every other minion wave- Deals 1 core damage
Mercenary Camps
Recon Camp
- Easy, kite the henchmen- Gives 355 XP
- Spawns at 1:00
- 2 min cooldown after capture
- Earns you a scouting token that finds 3 enemy heroes
Fortification Camp
- Medium, kill engineer, then turret- Spawns at 1:30
- 2:30 min cooldown after capture
- Earns a turret token that lasts 45 seconds
Support Camp
- Hard, heals periodically, burst it down- Spawns at 2:30
- 3 minute cooldown after capture
- Earns a healing token that heals all allies in range
Boss
- Deals 1 core damage- Gorges a hero for 5 seconds (10s CD)
- Creates a large ring during Gorge
- Spawns at 5:00
- 5 min cooldown after capture
Who To Pick?
Our HotS boost team suggest the following heroes, regardless of their position on our HotS Tier List.- Rexxar
- Brightwing
- Genji
- Chen
- Falstad
- Tracer
- Varian
- Zarya
- Zagara
Strategies In Depth
Single-Group Push
This uses the same “basis” that other 5-man push strategies use; overpower the enemy early on and obtain a level lead for pressure on their towers.The reason it works so well on Hanamura, though, is because of the way the objectives work uniquely on this map. An early fort can be devastating if you cap a payload for two shots out of seven total health; an early keep is even more devastating. The enemy will have to be consistently playing on the back foot to defend from sappers, and if you protect your sappers through teamfights or just focus on pushing your payloads the enemy will have no choice but to ignore one or the other.
The reason it’s so effective on this map is because of certain specialist and support heroes; the way to “counter” this strategy is to either push harder in the opposite direction or successfully defend the push. The more optimized your comp is for this strategy, the harder it will be for the enemy to do either of those things.
Drafting Sylvanas for this map is a fantastic idea because of how important it is to shut down structures. On top of that, she has easy escape/mobility if you have to teamfight around payloads down the line. If you draft Sylvanas early, they might have to draft around catching you; if they do, your team can capitalize off of them being weaker in other areas.
Another fantastic pick for this strategy is Azmodan. Yeah, everyone knows Azmodan is a great seiger, but in a 5-man push his laser build (“All Shall Burn”). He’s tankier than other siege heroes like Sylvanas, which is great for when the enemy tries to counterpush or engage a teamfight in response. He’s less mobile, but he doesn’t “need” to escape if he can stand and swing with the enemies.
Speaking of mobility, Zagara is great for a similar reason. High movement speed in the lane due to creep means she can navigate through the wave of skillshots and weave in and out of danger while her summons do her duty work.
Other than specialist heroes, the rest of the comp for this strategy is pretty simple: two frontliners, a mage, and a support. Because you plan to be sticking together as much as possible early on, I’d pick heroes that are well-equipped for AoE situations. Johanna is a great frontliner here, as is Diablo (especially because the enemy team will be forced to focus its efforts on recovering if you make a pick). Janna, Li-Ming and Kael’thas are the obvious mages, and Li-Li and Rehgar make great supports.
4-and-1
If it isn’t clear yet, “early advantage” is the name of the game on Hanamura. While four apply pressure, the solo laner stabilizes an advantage in the other lane, potentially getting damage to the core by themselves.You really need someone with sustain, ideally a bruiser, that can push and duel equally effectively. The heroes that come to mind are Sonya and post-rework Thrall; it is nigh impossible to push them out of lane, and if they get hungry for a kill they can chase hard. Sonya’s whirlwind just eats waves alive, as does Thrall’s chain lightning.
Leoric is good as a solo-laner for this strategy, but he’s more defensive than Sonya and especially Thrall. He doesn’t push as hard but Wraith Walk/Undying passive make it hard to push against him. A well-played Leoric is going to make sure that their solo-laner doesn’t get the advantage that they want.
Those are meta picks, though. If you want something a little more unconventional…
Rexxar is the best payload-pusher in a “1v1” situation because Misha counts as an extra hero, and a well-played Rexxar can absolutely hold his own using Misha’s sustain.
Alternatively, you can pick someone with global presence like Falstad or Dehaka. These two heroes would be better in a less-coordinated team so you can help out when things get rocky instead of sticking to the solo-lane gameplan.
Last but not least, you could always go for my main: Lost Vikings. You can try to stick two vikings at the bottom to turn it into a 4.75 versus 5 lane and keep one up top to soak XP, or you can keep all three up top and push the payload faster than the enemy. You also get a huge advantage with Bribe. Bribe is ridiculously good on this map because you only need one stack for the Support Camp, which is especially fantastic for TLV.
If you haven’t noticed, 3-2 split strategies aren’t nearly as effective on this map. It’s a duo-lane battleground with a massive wide-open space; roaming is more difficult in general and the objectives are situated in changing areas that force grouping.
With these strategies, your win-rate on Hanamura will increase--guaranteed. Ideally, after reading this guide, you won’t groan when it shows up in your ranked queues. Well, maybe you’ll still groan. Just not as loud.
Closing Words
I hope you enjoyed reading our Hanamura guide, make sure to also check our Genji guide. For the best heroes to pick on every map, visit our regularly updated Heroes of the Storm Tier List.Thank you for reading our guide. Let us know if you disagree with anything or an update is needed! :)

Top 50